The software allows you to adjust setting to be applied to lettering while the design is still in wire-frame format.
Embroidery setting can be accessed by left clicking on the Embroidery Properties Icon from the Create Lettering tool bar.
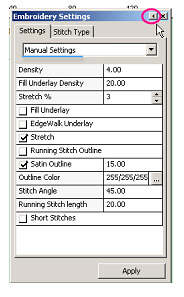
This will place a ‘roll-over’ dialog box on the canvas. Place the mouse over the bar to expand. Left click on the arrow on the bar to hold open the dialog box.
Under "Manual Settings" these parameters can be adjusted.
Density – the lower the number the closer the stitches become.
Fill Underlay Density– runs at a 45 degree angle to the fill. User can select density.
Stretch% - Stretch or ‘grow’ design in the direction of the stitches sometimes referred to as ‘pull compensation.’
Edge Walk Underlay – stitches a running stitch around the inside parameter of the design.
Running Stitch Outline – can be added to lettering in either the same color or in a different color. This adds a nice finished look to letters.
Satin Outline – adds a column outline either in same color or can select to change color of outline. You can also adjust the width.
Outline Color – click on small square to select new color for outline (note- only applies when running or satin stitch outline has be selected).
Stitch Angle – the angle the fill pattern will sew.
Running Stitch Length – stitch length can be adjusted. Setting similar in length to standard sewing machine stitch length.
Short Stitches – inserts short stitches on outside curves of letters. This prevents gaps without setting overall density too high. A too high density may cause inside curves to have too many stitches.
Note: User must click on "APPLY" after each change made.