Most importantly, it is absolutely necessary that you use only SINGER® branded needles. Other brands can eventually damage the hook and the machine will require servicing. You can use a 2000 or 2020 for natural or woven fabrics and 2001 or 2045 for knits and other synthetics.
Accessory Use
Yes, your SINGER® FUTURA™ sewing and embroidery machine uses a plastic class 15J bobbin. You can purchase this bobbin through your local SINGER® retailer. Never use pre-wound bobbins in your machine. When using the sewing side of the machine, you can use regular all-purpose thread in the bobbin, but when using the embroidery side, you will need to use what is called "bobbinfil". This is a finer weight thread that is ideal for embroidery. There are brands that are better than others; we recommend a spun poly bobbinfil sold under the Robison-Anton or Sulky brand name.
Embroidery Designs
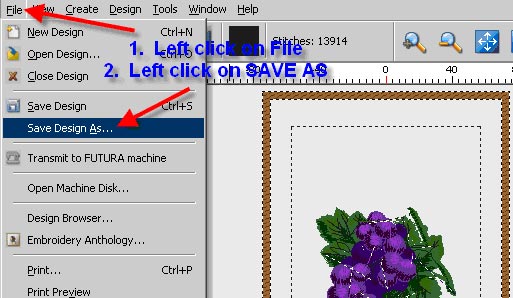
1. From the toolbar left click on file, and then from the drop-down menu select "Save Design As".
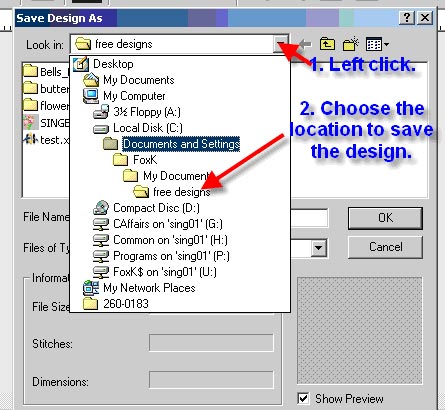
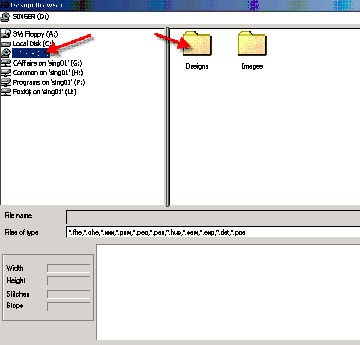
2. Next left click on the drop down menu arrow and choose the location where you want to save your design.
3. Create a new folder to hold any designs that you will be saving.
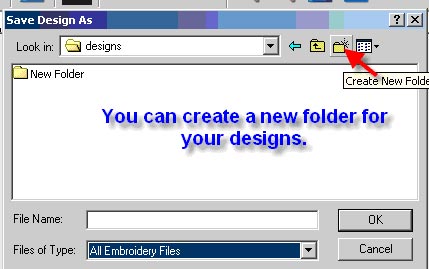
4. Right click on the "New Folder" and then select "Rename", then enter the name you wish to give this folder.

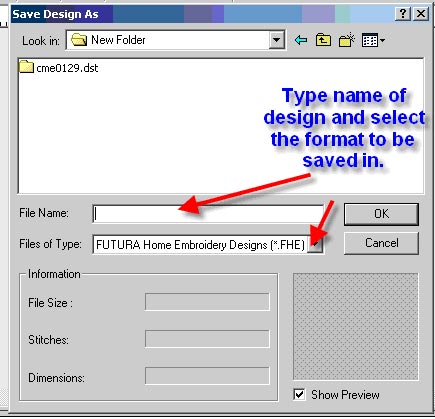
5. Under File name, type the name of the file or design and select the format that the design will be saved in (.FHE).
1. Select the file to download:
2. Example shown uses one of the free designs from our USA website www.singerco.com
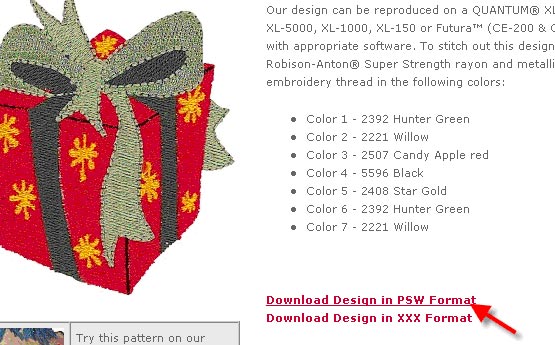
3. Select the format that you want, PSW or XXX.
4. Then choose OPEN instead of SAVE
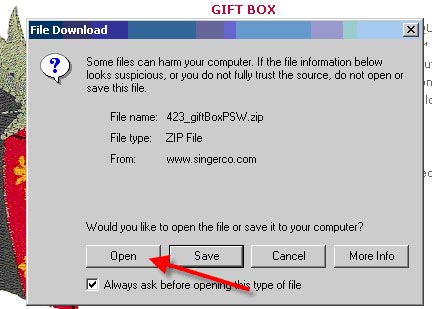
5. This will open the design directly into the extraction program on your computer.
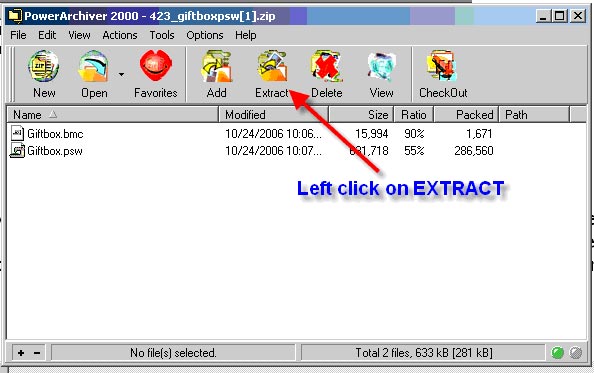
6. Your program may vary from the one shown, but they all work similarly. Then choose extract or unzip. Make sure to select "ALL FILES" and then choose the destination. You can make a separate folder for the design at this time if desired.
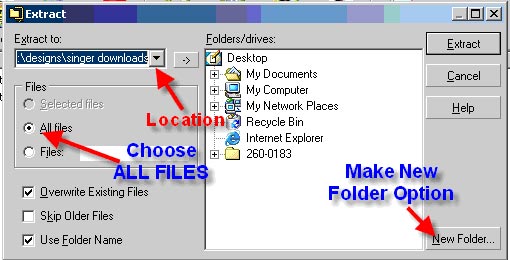
7. Make sure to note where you are unzipping the design. Then when you open the embroidery software you will go to OPEN and locate this folder and be able to see and open the design.
8. This procedure is much easier than choosing to Save the design and then trying to locate the design, and find the extraction program.
The file may not have been unzipped.
See the other FAQ on "How do I unzip a file that I have downloaded"?
Embroidery Use
1. Replace the embroidery thread on your spool pin with Bobbinfil thread, wind the thread around the thread guide located over the transparent threading path on the top of your machine and then slip the end of the thread through the opening in the bobbin from the inside to the outside.
2. Place the bobbin on the bobbin winder shaft and push the shaft towards you.
3. Hold the thread end securely above the bobbin as it begins to wind.
4. Allow the bobbin to turn several (10 to 12) times and then stop the machine by pushing the shaft towards the back. Cut the thread at the top of the bobbin as close to the bobbin as possible. Continue to wind the bobbin by pushing the shaft back towards you.
5. The bobbin will stop turning when it is full. Push shaft to the back, clip the thread and remove the bobbin from the shaft.
6. Remove the hoop from the machine, (DO NOT REMOVE YOUR FABRIC FROM THE HOOP), replace the empty bobbin and then re-insert the hoop.
7. If your design moved forward a stitch or two when you picked up the bobbin thread, you can use the backstitch operation switch on the front of your machine to move back to your original position.
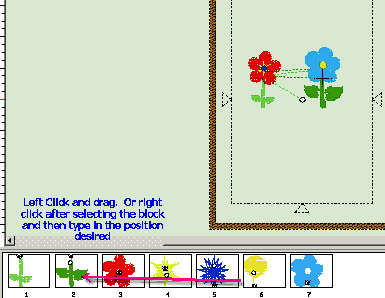
1. You can sort the color blocks together in the Object List. Left click on the color block you wish to move and then right click. In the Pop-Up menu you can type-in the new location number.
2. Select Reorder in the Pop-Up menu. Then left click on “To Position”. Type in the new sewing order.

3. Repeat until you have grouped all the same colors together.
4. Another method is to simply drag to the desired sewing order.
Click and Drag Method.
Left click on the block you want to move. Then simply hold in the left mouse button and drag to the new location.

You also can select multiple blocks and move them at the same time. Left click on the first block then hold in the Control Key and left click on the next block, repeat as necessary. Then left click on the group and hold in the left mouse button while dragging to the new location.

The following steps must be followed for proper start-up. If these steps are not followed precisely, you will get a “Transmission Pending” error message.
1. Boot up your computer but do not open the software for the SINGER® FUTURA™ machine.
2. Attach the embroidery unit to your sewing machine and connect the USB cable between your computer and the sewing machine.
3. Turn on your sewing machine by setting the Power/Light switch to ( l ). Make sure the needle has been moved to the highest position by turning the hand wheel towards you.
4. Attach the hoop that you plan to work with to your embroidery unit.
5. Double click on the SINGER® FUTURA™ Icon on your desktop to open the software.
6. You are now ready to select and transmit a design to your machine.
IMPORTANT: If you have embroidered using the small hoop and you are now ready to use your large hoop. Turn off your machine, close the software and then turn OFF your computer. Wait one minute, turn on your computer and then follow steps 1 through 5 above.
You can easily resume where you were stitching if you follow these steps. Before shutting down the machine, be sure to save the design that you were working on. This is important if you can change the size or the position of the design. Take note of which color block that you were working on. Now, you are ready to exit the navigator and shut down the program and the machine. You can remove the hoop from the embroidery unit if you need to, but DO NOT remove the fabric from the hoop. To resume embroidering, turn on the machine, open the program and reattach the hoop if you removed it. Send the design to the machine. Use the double arrow box to the right of the send block box to advance to the color that you were sewing out when you turned off the machine. If you had already started embroidering that color, use the needle up/down touch to move the needle to a few stitches ahead of the place where it last stitched. Thread the machine and start embroidering.
On the front of the machine, just above the "Start" button (red/green light) is the "Return Arrow" button. In embroidery mode, this will back up stitches while depressed.
The "Needle Down" button (sewing mode) will forward a stitch at a time when depressed.
1. In order to wind a bobbin you must transmit a design to the machine, as well as send a block to your sewing machine.
2. If no design has been transmitted and no block of color sent, the bobbin winder will not work.
3. Replace the embroidery thread on your spool pin with Bobbinfil thread, wind the thread around the thread guide located over the transparent threading path on the top of your machine and then slip the end of the thread through the opening in the bobbin from the inside to the outside.
4. Place the bobbin on the bobbin winder shaft and push the shaft towards the right.
5. Hold the thread end securely above the bobbin, and then press the green operation switch on the front panel of your machine to begin winding. (The foot control is inoperable with the embroidery unit attached)
.
6. Allow the bobbin to turn several (10 to 12) times and then stop the machine by touching the red operation switch on the front panel of your machine. Cut the thread at the top of the bobbin as close to the bobbin as possible. Continue to wind the bobbin.
7. The bobbin will stop turning when it is full. Push shaft to the left, clip the thread and remove the bobbin from the shaft.
8. Remove the hoop from the machine, (DO NOT REMOVE YOUR FABRIC FROM THE HOOP), replace the empty bobbin and then re-insert the hoop.
9. If your design moved forward a stitch or two when you picked up the bobbin thread, you can use the backstitch operation switch on the front of your machine to move back to your original position.
Embroidery Use- Hoop
See PDF for instructions on how to Multi-hoop on your SINGER® FUTURA™sewing & embroidery machine.
1. Raise the presser foot and the needle.
2. Place the hoop behind the foot and bring it forward. This will tilt the foot up and allow the hoop to slide more easily into position.
3. Hold the hoop securely in position and tighten hoop-mounting screws with a screwdriver.
We recommend tightening the screw by hand to hold the fabric in the frame. Repeated over tightening of the screw with a screwdriver can eventually cause damage by either stripping the screw threads or potentially cracking the hoop.
If the screw has been stripped you may need to replace it.
Machine Use
The following illustrates how to sew a 1-step Buttonhole:
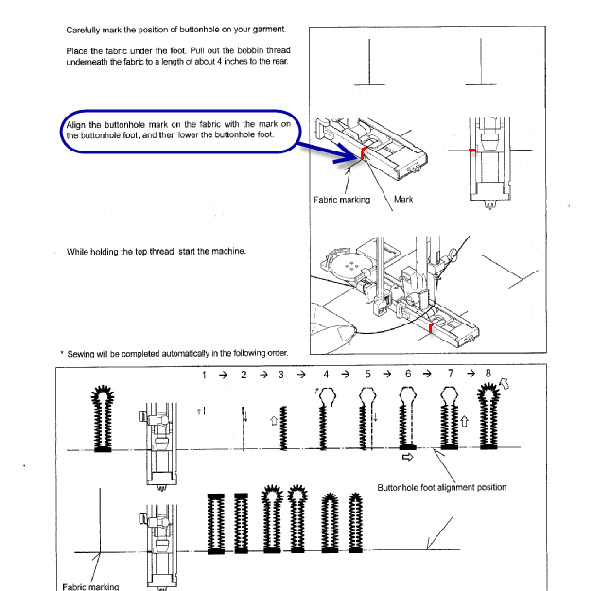
When the buttonhole has completed the machine will stop sewing automatically.
* It is important that the buttonhole foot stays level at all times, if working on a buttonhole at the top edge of a garment, it may be necessary to insert a piece of fabric at the back of the foot to keep it level.
* If the buttonhole lever touches either the front or back of the buttonhole foot the machine will beep and refuse to sew.
You must use bobbin part number 085128. This bobbin is specifically designed for the SINGER Futura . Do not use standard class 15 bobbins. Do not use metal bobbins. Pre-wound bobbins are not recommended, as they cause tension problems and will result in poor quality embroidery.
Software Installation
Installing the software for your SINGER FUTURA machine is detailed in your Instruction Manual. For your convenience, click here to download that section.
1. Right click “My Computer” on your desk top.
2. Left click on “Properties”
3. Select the General folder
4. Information appears under System.

For Windows Vista and 7:
1. Click on “Start”.
2. Right click on “My Computer”
3. Left click on “Properties”.
4. Information appears under system
Software Use
Click on "Tools" on your toolbar. Click on "System Parameters" Under Unit System you have the option to select the Metric or English system.

Whether using HyperFont software or your choice of the two built-in fonts, you can create a monogram in the software for the SINGER FUTURA. This can be either 2 or 3 letters. Apply the stitches. Next de-select the Text tool to return to the main screen. Now add your grid lines by left clicking on VIEW on the horizontal tool bar and select Show Grid:
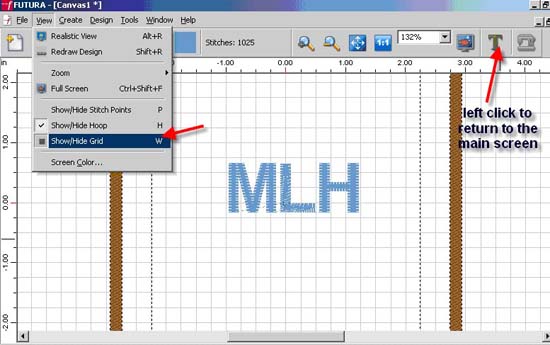
1. In the TOOLS menu on the horizontal tool bar, you can set the grid size. (we suggest ½" or ¼")
2. Left click on the individual letters to highlight and resize them independently. You can also move and position each letter as desired by left clicking in the center of the box around the letter.
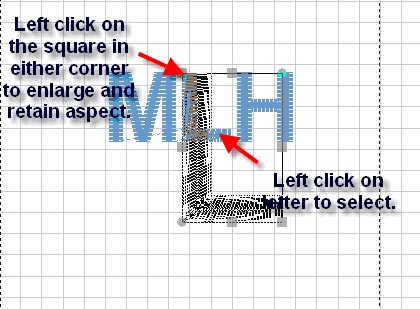
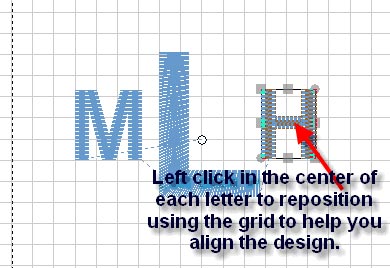
3. Don't forget that you can italicize the letters too, for another style.
4. Pull the diamond at the bottom left corner toward the left to italicize the letters to the desired slant.
5. Apply the stitches, left click on the "T" to return to the main program so you can edit the letters into the desired shape for the monogram. Don't forget to use the grid lines to aid in placing the letters.
6. Left click on individual letters to highlight them, then move and position them into desired shape of monogram as previously described.
To insert a stop, just left click on the color block on the Horizontal tool bar before adding the lettering.

It is possible to merge color blocks or take out a stop between colors. These colors will need to be the exact same color in order to merge.
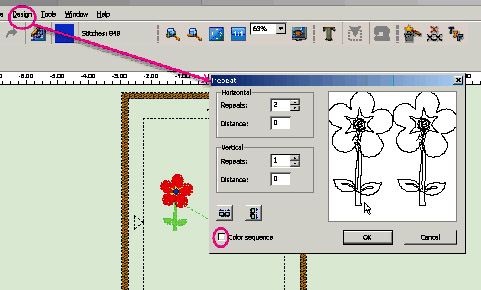
There are several ways to accomplish merging. If you are repeating a single pattern you can use the Repeat function under the Design submenu and the select Color Sequence. This will merge the colors automatically.
However if you have different designs with similar colored blocks and you want to sew out these colors all at once you can drag the color blocks next to each other in the Object List.
Left click and drag the block next to the color you want to merge it with.
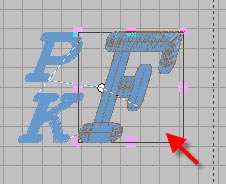
In our illustration the two green blocks are not the same color. You will need to change them to the same color or just start the machine sewing again without rethreading the machine when it completes color block one.
To change to the same color you will use the Eye Dropper in the Palette - Here’s how you will do that. Highlight the block that you want to change by left clicking on the color block in the Object List tool bar.
Then open the color palette by bringing the mouse into the canvas and right clicking. Left click on "Change Color" from the pop-up menu.
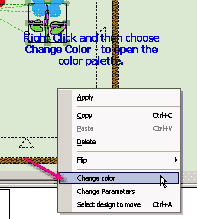
Then move the cursor off the palette and onto the color block you want to change to. Left click to pick up this color. Then click on "OK" in the Palette.
This should change the selected object or block to the color that the dropper picked up.
Sometimes the colors will merge automatically when you click "OK" in the Palette. Other times you will have to drag it over.
Merging happened automatically when the OK was clicked in this exercise. In the flowers we’ve chosen you could make the blues and yellows all the same and merge these colors too by repeating the same steps as above. (Note: in order to merge, block must be adjacent)
1. Type in the desired text in the lettering portion of your software. You can also use this technique with the HyperFont lettering software.
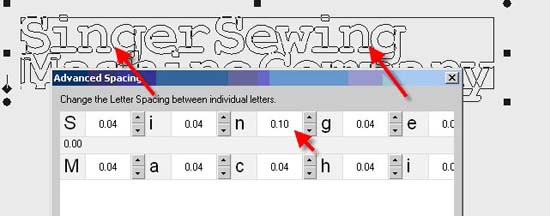
2. Right click in a blank area of the screen. Then, left click on ADVANCED SPACING. There are 2 areas where you may want to add space, either between lines or between letters. We will look at spacing between lines first.

3. Type in the new value and then press the Enter key on the keyboard and then click okay to see the change. These values appear as metric.
You may need to experiment to achieve the desired spacing. The illustration below used 150.00 then ENTER and okay to move the lines apart.
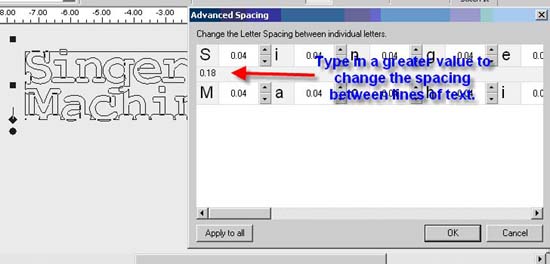
4. Spacing between individual letters is referred to as "Kerning". You will type in values only between the letters that need to be moved apart. In the above illustration you might want more space between the "n" and "g" in Singer and also in Sewing.
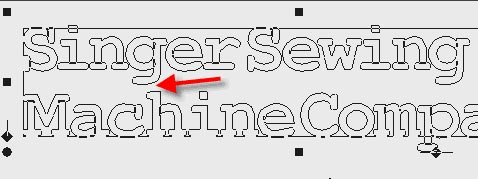
Only the first letter combination has been adjusted to .10 so that you may compare the difference with the kerning adjustment. You can see how the spacing is more pleasing.
Once you have edited in the desired spacing. Left click on OK and then apply the stitches.
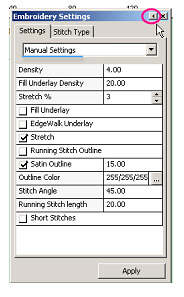
The software allows you to adjust setting to be applied to lettering while the design is still in wire-frame format.
Embroidery setting can be accessed by left clicking on the Embroidery Properties Icon from the Create Lettering tool bar.
This will place a ‘roll-over’ dialog box on the canvas. Place the mouse over the bar to expand. Left click on the arrow on the bar to hold open the dialog box.
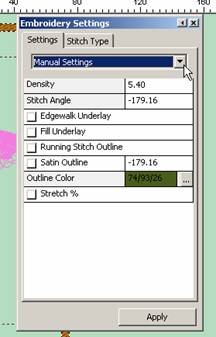
Under "Manual Settings" these parameters can be adjusted.
Density – the lower the number the closer the stitches become.
Fill Underlay Density– runs at a 45 degree angle to the fill. User can select density.
Stretch% - Stretch or ‘grow’ design in the direction of the stitches sometimes referred to as ‘pull compensation.’
Edge Walk Underlay – stitches a running stitch around the inside parameter of the design.
Running Stitch Outline – can be added to lettering in either the same color or in a different color. This adds a nice finished look to letters.
Satin Outline – adds a column outline either in same color or can select to change color of outline. You can also adjust the width.
Outline Color – click on small square to select new color for outline (note- only applies when running or satin stitch outline has be selected).
Stitch Angle – the angle the fill pattern will sew.
Running Stitch Length – stitch length can be adjusted. Setting similar in length to standard sewing machine stitch length.
Short Stitches – inserts short stitches on outside curves of letters. This prevents gaps without setting overall density too high. A too high density may cause inside curves to have too many stitches.
Note: User must click on "APPLY" after each change made.
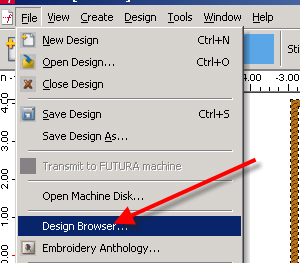
1. To view designs from a Stock Design CD, place the CD in the CD tray and use the design browser.
2. Left click on File > Design Browser:
3. Double left click on the DESIGN folder. Then all the folders on the CD will be available. Choose the folder (category) and then you can view all the designs in that folder. Then click on the desired design to view the color steps and stitch count:
4. Then click on OPEN. This will open the design directly into the SINGER FUTURA Screen.
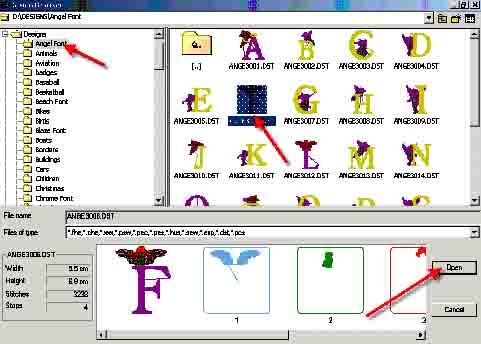
1. Place the Stock Design CD in the tray. You will see a Start Up Screen. Please close this screen.
2. On the top tool bar of the Futura program left click on File >Design Browser:
3. This will open the Browser to the following screen:

4. Double left click on the drive containing the Stock CD – Singer.
5. Double left click on the DESIGN folder.
6. Then all the folders on the CD will be available. Choose the folder (category) and then you can view all the designs in that folder. Then click on the desired design to view the color steps and stitch count:

7. Then click on OPEN. This will open the design directly into the Futura Screen.
SINGER® FUTURA™ machines report the hoop attached to the computer only one time, when the SINGER® Futura™ program is started. If there is no hoop attached the program will assume that the large hoop is mounted. So, if a user decides to use a different hoop than the one the machine has detected, it is necessary to change the program's setting before embroidering (see below procedure, Step 4). However, there is a correct procedure/sequence to set up the SINGER® Futura™ machines for embroidery. Preparing to embroider out of sequence will cause the computer to display an Error Message if the small hoop is used: The proper way to set up for embroidery on the SINGER® Futura™ machines is as follows:
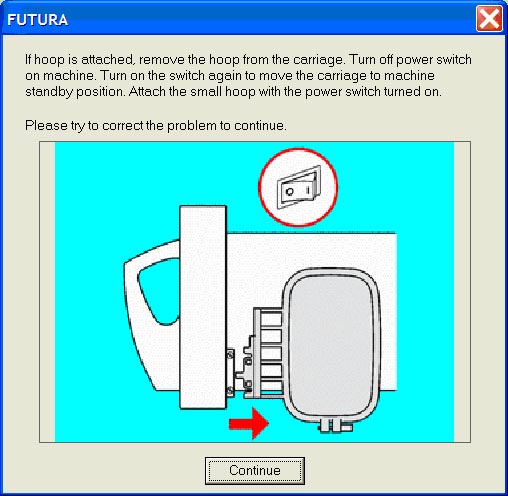
1. Turn the SINGER® Futura™ machine on, without the hoop attached.
2. Attach the hoop that you intend to use.
3. Now open the SINGER® Futura™ program. The system detects which hoop is on the machine.
4. If the Large Hoop is on the SINGER® Futura™ machine, but it is desired to change to the Small Hoop, remove the Large Hoop and replace with Small Hoop. However, before selecting a design, it is necessary to go to the Main Menu and select Tools>Select Hoop, then choose Small Hoop. (The same is true for moving from Small Hoop to Large Hoop, once the program has been opened).
However, changing back and forth between hoop sizes can cause the machine to get 'confused'. It is recommended to use the procedure described in Steps 1 through 3.
Note: If the machine is turned on with the small hoop already attached, the "Start Button" on the sewing machine will flash red. It will not be possible to proceed unless the machine is turned off, the hoop removed, and then the above steps followed in correct sequence.
Uninstall the software for the SINGER® Futura™ machine and then re-install.
To Uninstall, select from “Start” -> “Settings” -> “Control Panel” -> “Add/Remove Programs” icon. From the appearing window scroll down until you find the SINGER® Futura™option and click on the “Add/Remove” button.
This will usually result when you are in the Text portion of your software. Simply left click on the "T" to return to the main program and all of the tools should now be accessible.
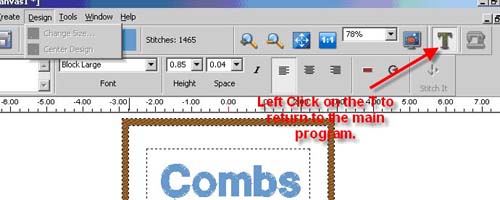
Once you turn off the Text you should be able to access your Tools under Design.
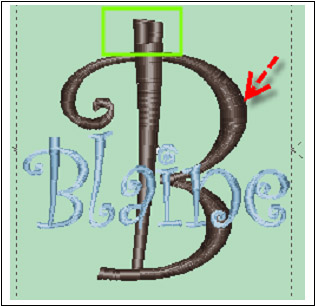
In some patterns with excessively long/wide satin stitches the SINGER Futura program may drop all or part the block, as these stitches exceed the recommended parameters for the length of a stitch.
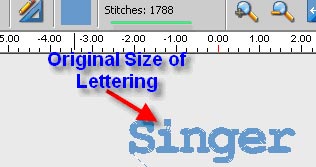
If you size down the pattern a few percent the stitches will re-appear. In this case we sized the pattern down to 95% of the original size as it was also too large to be sewn out.
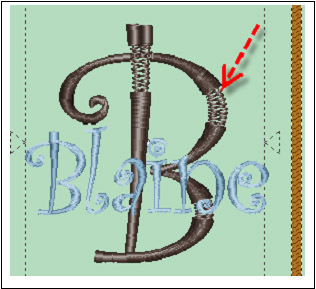
You can see that the stitches are back and you have a complete design. You may wonder why the area within the green outline in the top of the B was visible even though it is wider than the part that was omitted in the photo above. This is because this section is not sewn out using a wide satin stitch, but step stitches. This makes it narrow enough to be sewn out.
Your SINGER FUTURA sewing and embroidery machine has excellent "how-to" tutorials built into the software. To access these tutorials, open the software, from the top tool bar, click on "Help" and then select "How-to Tutorial". These tutorials include step-by-step instructions on how to open a design, how to change stitch colors and many more topics.
You can view or print a copy of the instruction manual on how to use the software. To view the manual, open the software. From the top tool bar, click on "Help" and then select "Open the Manual". To print the manual, place the program CD into the tray of the CD drive of your computer. If the Install Wizard begins, CANCEL the installation. Double click on 'My Computer" and you should see a drive with the FUTURA program identified. Double left click on that drive and then double left click on the "Manual" file. From there, choose the language that you need. From the file menu, choose the "Print" option. (For older computers, it may be necessary for you to "explore" the drive in order to access the manual).
Please install the newest update VERSION 4.0.0.5 FOR ALL OPERATING SYSTEMS ( Windows XP, Windows Vista, Windows 7). This will correct the problem. The update can be found by selecting your Machine Model and then clicking Software Updates.
Design fonts will open just as other imported designs will. They cannot be used as keyboard fonts like the built-in lettering. You will need to open the H and then open the E by using the File->Paste Design submenu. This will open the new letter into the existing layout. Then import the other letters using this same menu.
When working with these types of letters you may find it helpful to add the Grid from the View submenu. You can adjust the grid size under the Tools->Set Grid Size submenu..
Should these fonts have multiple colors you can then Design->Merge by Color menu to have less color changes:
Software Use (Designs)
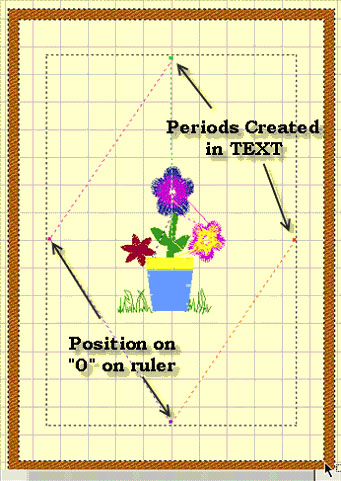
1. Pull up the design and center in the hoop on screen. Left click on the lettering tool. In the text box type a period. Insert a color change by left clicking on the color box on the horizontal tool bar; choose another color from the palette. Now move the text box off the design toward the top of the hoop. Left click on “Stitch It.”
2. Now return to the main screen (deselect lettering by left clicking on it). Select the period to move and position the period just inside the sewing field aligning it with the “0” on the top ruler.
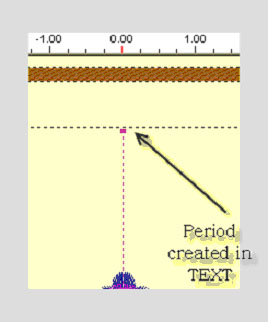
3. Insert a color stop by left clicking on the color box on the top tool bar and selecting another color. Now go back into the lettering portion of the program and repeat the above steps, but this time place the period at the side of the hoop on the “0” on the ruler. When you have placed periods on all four sides, print the design. The periods will show on the printout. You can now use this to make a template for placement. Select the Show Grid option from the View menu on the horizontal tool bar for ease in placement of periods. (The Grid will not print.)
Use the "DESIGN BROWSER" located under FILE on the horizontal tool bar.
Not only can you view the design, but also when you select it you can see the color blocks, size and stitch count.

In the software for the SINGER FUTURA it will recalculate the stitch of an imported design when sizing, but only when using the DESIGN>CHANGE SIZE option. It does have a limitation of re-sizing up to 149% and down sizing to 51% and while still being able to re-calculate the stitches correctly
If these parameters are exceeded the stitch processor is not accurate.
It is possible to use the stitch processor option, found in the Change Size Pop-Up screen to correct the density of an imported design. If the design isn’t dense enough, deselect the stitch processor and size the design down 2-3%. The opposite would be true of a design that was too dense. Simply size it up 2-3% with the processor turned off.
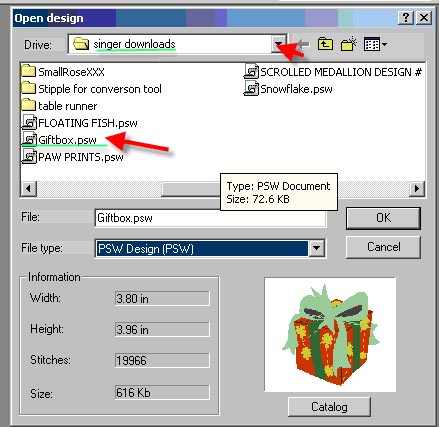
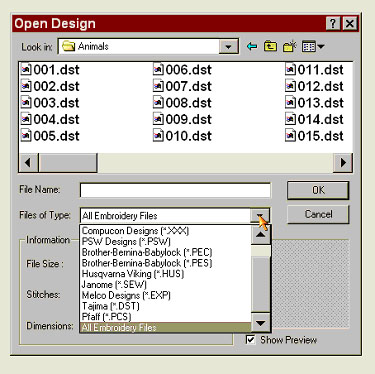
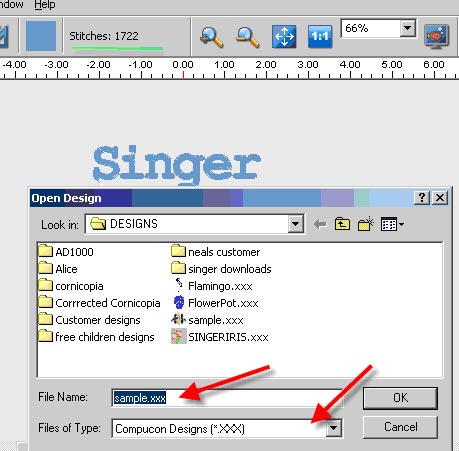
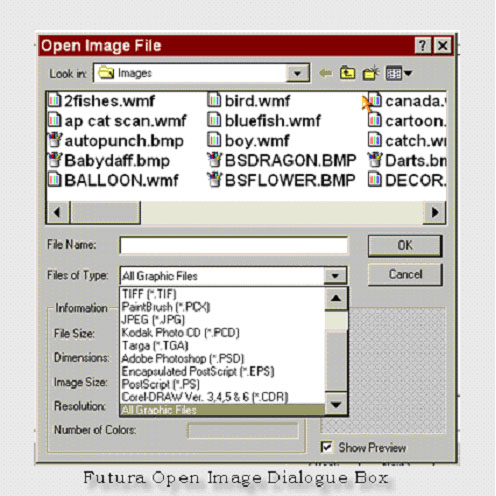
FHE, CHE, XXX, PSW, PEC, PES, HUS, SEW, EXP, DST, AND PCS.
This information is located in the OPEN DESIGN dialog box under the File Type drop down menu.
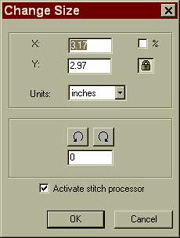
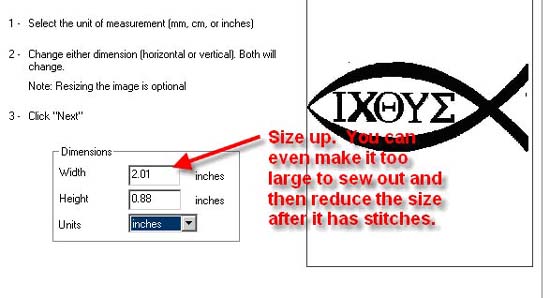
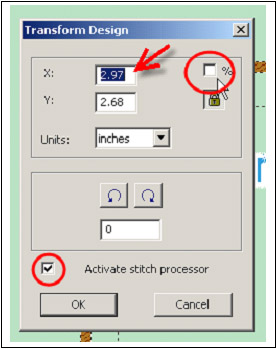
1. When importing a design from an outside source, the designs can be resized using the Change Size dialog box.
2. To change the design proportionately, first click a ‘check’ in the box above the Padlock icon. This will convert the dimensions from working in actual measurements, to working in percentages.
3. Simply type in the amount of change in either the X or Y dimension box. Click OK, and the design will change size and will recalculate the density.
4. When clicking and dragging around an imported design to change size, it is possible to change size proportionately by clicking and dragging either the upper left or lower right corner. However, even though the design has changed size, it does not (using this method of resizing) recalculate the density.
5. When using designs from the SINGER Futura™ Library, it is possible to resize in either method above, and the design density will recalculate.
When sizing designs in the software for the SINGER FUTURA you can resize designs from the Library in the hoop on screen and keep the design integrity.
All other formats should be changed in the DESIGN/CHANGE SIZE menu in order to change the stitch count.

1. Click on “Create” on the top tool bar.
2. From the drop down menu select “Design Library”
3. The software automatically defaults to “Large Hoop” designs.
4. Double click on the sesign of your choice – Grey shaded design will appear in hoop
.
5. Position curser inside of design and “Right click”.
6. Click on “Apply”, this will fill the design with color stitches.
7. From the top tool bar click on “Design”. From the drop down menu select “Center Design”
.
8. To transmit design to machine, click on sewing machine icon on the top tool bar. (You can also click on “File” on the top tool bar and then click on “Transmit to machine”).
9. Machine Navigator pop-up screen appears.
10. For CE-100 or CE-200 Click on “Send”; this sends one color at a time. When the color is completed, you will need to click on "Send" for the next color.
11. For all other Futura machines Click on "Send Block", this sends one color at a time. When the color is completed, you must click on the "forward arrows" to the right of the "Send Block" box to advance to the next color. Click on "Send Block" to stitch out the next color. You can also choose to click on "Send Design", in this case all colors of the design will be sent to the machine at the same time. The machine will automatically stop after each color to allow you to change out the color of the thread.
11. Touch “Green Start/Stop” button on the front of the machine and machine will start to sew.
You cannot import more than one design into the hoop unless it is from the Built-in Library designs. It is possible to add a Library design or Lettering to a pre-digitized design during layout.
With the SINGER FUTURA you can merge imported designs by opening the second design through the File > Paste Design menu
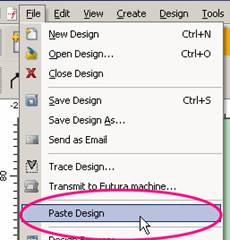
Using this feature will open any additional patterns into the previously opened canvas.
Open the first design as usual. File > Open or use the tool bar shortcut icon. Then when opening the next pattern left click on File > Paste Design. This function can be repeated as many times as desired.
1. Select "Show/Hide Grid". On the top tool bar click on 1.1 Open design 2 (B).
2. Under "Tools" set the grid size to ½", and then in the "View" menu, select "Show/Hide Grid" to place grid on screen.
3. On the top tool bar click on 1.1 Then on the top tool bar under Windows select the "Tile" option.
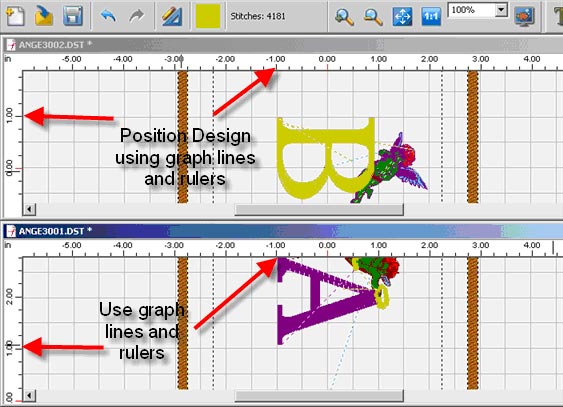
4. You can then adjust and move the design into perfect position, going back and forth between Windows. Right click on the screen and then "Select Design to Move."
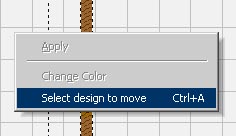
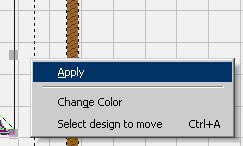
5. Left click on the design and move to desired position. Then right click and select "Apply".
6. You will now be able to embroider multiple designs in a single hoop without repositioning the hoop.
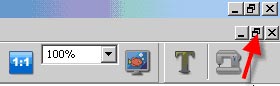
7. To see the design full screen, left click on the left side of the top tool bar on the Minimize/Optimize button.
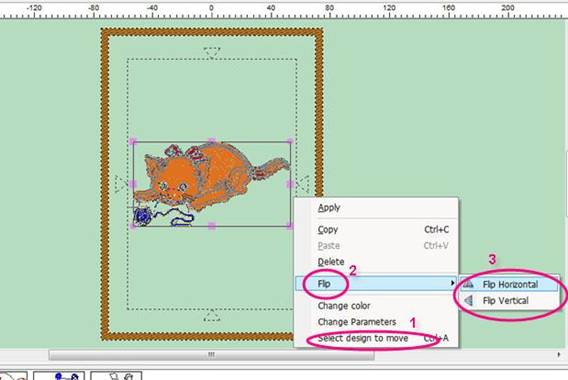
1. After you load the pattern into the hoop, right click and then left click on "Select Design to move". This will highlight the pattern.
2. Now right click again and you will now be able to left click on "Flip".
3. This will open a side bar that gives you the option to flip or mirror, vertical or horizontal.
Software Use (Lettering)
To add density to built-in lettering use the following directions. This process will work both with the built-in fonts and the ones created using Hyperfont.
1. Create the lettering as usual. Then save the letters in a format other than the .fhe or .che file. Close the screen.
2. Re-open the new design:
3. When opening the saved file please note the stitch count of this file. Next left click on DESIGN > Change Size on the horizontal tool bar. (You can add more then the 12% shown in this illustration.) We find it easier to do this by percent. Left click on the % box.
4. Size up the design. With the Stitch Processor activated this will add more stitches to the design. Then press OK. The lettering will now have 12% more stitches.
5. Next left click on Design > Change Size and size the lettering back to the original size. But this time DESELECT the Stitch Processor by left clicking on the box.
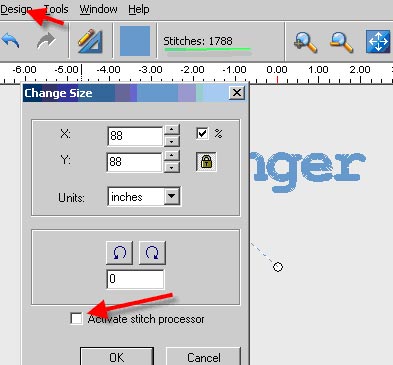
6. Left click on OK. The design should retain the additional 12% of stitches, but be back to the original lettering size
The density is set to a standard value of 4/10th of mm, which is usually the standard density used for Lettering.
The value is not editable.
You can resize individual letters after you have brought them into the hoop and exited the text window.
Left click, drag a box around the desired letter, and size accordingly. Because the letters are built-in, the letter will keep the appropriate density.
Software Use- Auto CrossStitch™
To load base software and AutoCross Stitch 1.0.0.1 (If you have other options programs such as AutoPunch, HyperFont etc, load those first before loading AutoCross Stitch)
1. Install Base software (have machine set-up for embroidery with USB connected to both the machine and computer- machine turned OFF)
2. Turn on SINGER Futura machine and double left click on SINGER Futura icon to open program
3. Close program and then turn off machine
4. Install Auto Cross Stitch program and leave CD in tray
5. Download appropriate update for Windows version from the Futura-Support.com updates (See "Software Updates" section under your Machine section) and save to desktop.
6. Double left click on the desktop download icon to install
7. Turn on SINGER Futura machine and double left click on Futura icon to open program
8. Type in Access Code from Auto Cross Stitch jewel case and then left click on check mark*
* Must open the program after installing each Option with CD in tray and type in Access Code before installing next Option.
Software Use- AutoPunch™
While the software will read various formats, not all images are suitable for AutoPunch.™ AutoPunch™ digitizes by color change. Clear, simple images will give the best results. AutoPunch™ is not suitable for use with photos. The PhotoStitch™ software has the ability to change photos into embroidery designs.
This program is available through your local SINGER Retailer.
AutoPunch™ is not suitable for digitizing TrueType Fonts. There is however an optional program that you may purchase called HyperFont™. This software is designed specifically to digitize the TrueType fonts that are available on your computer.
Visit your local SINGER Retailer for details.
Open software for the SINGER® FUTURA™. Go to Create and click on AutoPunch on the drop down menu.
AutoPunch™ is not suitable for the creation of lettering. It is unable to read the data in order to process it correctly. Even if you created the letters in graphics software and brought them into the SINGER Futura™ program, the AutoPunch™ is unable create a satisfactory result.
There is an optional program called HyperFont™ that will automatically digitize any built-in TrueType fonts from your computer. This program is available through your local SINGER Retailer.
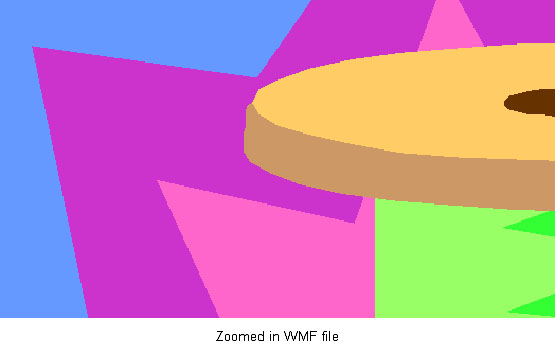
Color Reduction cleans up and simplifies an image by reducing the number of colors in an image. You can either allow the program to decide the colors or manually select the colors.

1. Notice when you choose the image that there are many different formats. AutoPunch gives the best result when using vector type images, such as .wmf. The software must be able to recognize a color (block) of information. A “. bmp” can be made of millions of colors making it impractical for use.
2. Clipart falls into two basic categories, Vector Art and Bitmapped Art.
3. The software is capable of vectorizing the “.bmp” image, but it may loose detail, depending on the image. It is essential to understand about the type of artwork or image used with AutoPunch.

4. Vector Art is a clean “graphic” blocks of color – by simple definition. Some common formats - .wmf and .emf are two formats that the Auto Punch software can read.
5. Bitmapped Art is the type of “format” that is typically saved when scanning. The computer sees millions of colors to create the “realistic” type of image. Even a 3-color design that we see as simple has billions of pixels. Common formats recognized by the software: .bmp, .jpg, .tif, .pcx, .pcd, .tga, and .psd.
Tips for Auto Punch:
1. Scan art with a “high resolution” (200-300 DPI).
2. Scan at 3-6 times larger than the intended output.
3. Lines that are too narrow to properly sew out are eliminated by the software when it cleans up the artwork.
AutoPunch™ will read imported clipart files. It will not in most instances do an adequate job of digitizing lettering created in Word. If you save it in a high resolution and size up the design before you try to digitize it you can have better results.
The most successful results will be obtained when you use our software called "HyperFont" to digitize letters.
1. In the Wizard you definitely need to look at the design during the color reduction step.
2. Reduce the colors in the image.
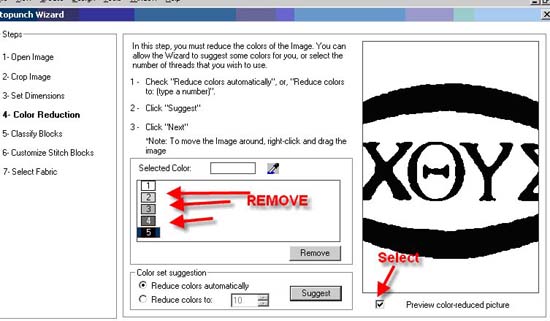
3. These are the results after reducing the colors down from 5 to 2.
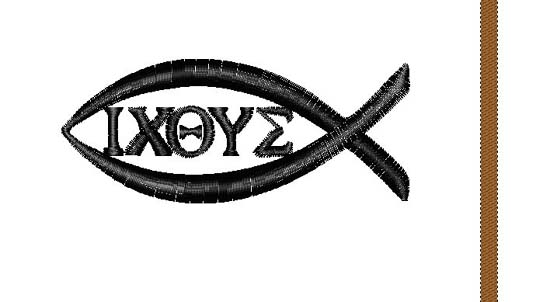
Here is the finished product.
There is a very informative manual located on the AutoPunch™ CD.
To access the manual return the CD to the drive and go into Window Explore and find the AutoPunch™ CD. You will find a file named “Manual,” just double left click on the icon and it will open the .PDF file OR access if here:
There are now several versions of the software for SINGER® Futura™ and AutoPunch available on the market. The most current is version 1.0.0.2. To determine what version of either software you have, you will find this information around the inside rim of the CD at approximately 4 o'clock. Before loading AutoPunch into your computer, check the version and then follow the steps below.
To load base software 1.0.0.0 with AutoPunch 1.0.0.0 or base software 1.0.0.1 with AutoPunch 1.0.0.1
1. Load Base software (have machine set-up for embroidery with USB connected to both machine and computer – machine turned OFF)
2. Turn on SINGER® Futura™ machine and double left click on Futura icon to open program
3. Close program and turn off the machine
4. Install AutoPunch and leave the CD in the tray
5. Download appropriate update for Windows Version from the Futura-Support.com updates and save to desktop
6. Double left click on the desktop download icon to install update
7. Turn on SINGER® Futura™machine and double left click on Futura icon to open program
8. Type in the Access code from AutoPunch jewel case and then left click on the check mark to open program
To load base software 1.0.0.0 with AutoPunch 1.0.0.1 or base software 1.0.0.1 with AutoPunch 1.0.0.0
1. Load Base software (have machine set-up for embroidery with USB connected to both machine and computer - machine turned OFF)
2. Turn on SINGER® Futura™ machine and double left click on Futura icon to open program
3. Close program and turn off the machine
4. Install AutoPunch and leave the CD in the tray
5. Download appropriate update for Windows Version from the Futura-Support.com updates and save to desktop
6. Double left click on the desktop download icon to install update
7. Turn on SINGER® Futura™ machine and double left click on Futura icon to open program
8. Type in the Access code from AutoPunch jewel case and then left click on the check mark to open program
To load base software 1.0.0.0 or 1.0.0.1 with AutoPunch 1.0.0.2
1. Load Base software (have machine set-up for embroidery with USB connected to both machine and computer- machine turned OFF)
2. Turn on Futura machine and double left click on Futura™ icon to open program
3. Close software and turn off machine
4. Download appropriate update for Windows Version from the Futura-Support.com updates and save to desktop
5. Double left click on the desktop download icon to install update
6. Install AutoPunch using Installation Wizard – leave CD in tray
7. Turn on SINGER® Futura™machine and double left click to open program
8. Type in Access Code from AutoPunch jewel case and then left click on check mark to open program
To load base software 1.0.0.2 with AutoPunch 1.0.0.0 or 1.0.0.1
1. Load Base software (have machine set-up for embroidery with USB connected to both machine and computer- machine turned OFF)
2. Turn on SINGER® Futura™ machine and double left click on Futura icon to open program
3. Close program and turn off machine
4. Place AutoPunch CD in tray but CANCEL Installation Wizard
5. Download appropriate update for Windows Version from the Futura-Support.com updates and save to desktop
6. Double left click on the desktop download icon to install update
7. Turn on SINGER® Futura™ Machine and double left click to open the program
8. Type in Access Code from AutoPunch jewel case and then left click on check mark to open program
To load base software 1.0.0.1 with AutoPunch 1.0.0.1
1. Load Base software (have the machine set-up for embroidery with USB connected to both machine and computer – machine turned OFF)
2. Turn on SINGER® Futura™ machine and double left click on Futura icon to open program
3. Close program and then turn off the machine
4. Install the AutoPunch program and leave the CD in the tray
5. Turn on SINGER® Futura™ machine and double left click on SINGER Futura icon to open program
6. Type in the Access code from AutoPunch jewel case and then left click on the check mark to open program*
7. Close program and then turn off the machine
8. Download appropriate update for Windows version from the Futura-Support.com updates and save to desktop
9. Double left click on the desktop icon to install update
10. Turn on Futura machine and double left click on SINGER® Futura™ icon to open program
11. Close program and then turn off the machine
To load base software 1.0.0.2 and AutoPunch 1.0.0.2
1. Install Base software (have machine set-up for embroidery with USB connected to both the machine and computer- machine turned OFF)
2. Turn on SINGER® Futura™ machine and double left click on Futura icon to open program
3. Close program and then turn off machine
4. Install AutoPunch program and leave the CD in the tray
5. Turn on SINGER® Futura™ machine and double left click on SINGER Futura icon to open program
6. Type in Access Code from AutoPunch jewel case and then left click on check mark*
7. Close program and turn off machine
Software Use- HyperFont™
To load base software 1.0.0.1 with AutoPunch 1.0.0.1 with Hyperfont 1.0.0.2 or Photo Stitch 1.0.0.2
1. Load Base software (have the machine set-up for embroidery with USB connected to both machine & computer with machine turned OFF)
2. Turn on SINGER Futura machine and double left click on SINGER Futura icon to open program
3. Close program and then turn off the machine
4. Install the AutoPunch program and leave the CD in the tray
5. Turn on SINGER Futuramachine and double left click on Futura icon to open program
6. Type in the Access code from AutoPunch jewel case and then left click on the check mark to open program*
7. Close program and then turn off the machine
8. Download appropriate update for Windows version from the Futura-Support.com updates (See "Software Updates" under your Machine section) and save to desktop
9. Double left click on the desktop icon to install update
10. Turn on SINGER Futuramachine and double left click on Futura icon to open program
11. Close program and then turn off the machine
12. Install HyperFont program – leave CD in tray
13. Turn on SINGER Futura machine and double left click to open program
14. Type in Access Code from HyperFont jewel case and then left click on check mark to open program*
15. Close program and then turn off the machine
16. Install PhotoStitch program – leave CD in tray
17. Turn on Futura machine and double left click to open program
18. Type in Access Code from PhotoStitch jewel case and then left click on check mark to open program*
* Must open the program after installing each Option with CD in tray and type in Access Code before installing next Option.
To load base software 1.0.0.2 and adding all Options - Hyperfont 1.0.0.2, PhotoStitch 1.0.0.2, AutoPunch 1.0.0.2 and Cross Stitch 1.0.0.1
1. Install Base software (have the machine set-up for embroidery with USB connected to both machine & computer with machine turned OFF)
2. Turn on SINGER Futura machine and double left click on Futura icon to open program
3. Close program and then turn off machine
4. Install AutoPunch program and leave the CD in the tray
5. Turn on Futura machine and double left click on Futura icon to open program
6. Type in Access Code from AutoPunch jewel case and then left click on check mark*
7. Close program and turn off machine
8. Install Hyperfont program and leave the CD in the tray
9. Turn on Futura machine and double left click on Futura icon to open program
10. Type in Access Code from HyperFont jewel case and then click on check mark*
11. Close Program and turn off machine
12. Install Photo Stitch program and leave the CD in the tray
13. Turn on Futura machine and double left click on Futura icon to open program
14. Type in Access Code from PhotoStitch jewel case and then left click on check mark*
15. Close program and turn off machine.
16. Install Auto Cross Stitch program and leave CD in tray
17. Download appropriate update for Windows version from the Futura-Support.com updates (See "Software Updates" under your Machine section) and save to desktop
18. Double left click on the desktop download icon to install
19. Turn on Futura machine and double left click on Futura icon to open program
20. Type in Access Code from Auto Cross Stitch jewel case and then left click on check mark*
* Must open the program after installing each Option with CD in tray and type in Access Code before installing next Option.
See this PDF for how to "Create Hyperfont Text" in the SINGER Futura Sewing & Embroidery Machine.
Software Use- PhotoStitch™
PhotoStitch™ simulates an image with “special” stitch techniques. Unlike traditional embroidery, PhotoStitch does not use fills and running stitches.
When using a photograph in PhotoStitch™ use a large, clear, and high contrast image. When scanning a picture set the scanner at 150 dpi or more. Internet images usually have only 72 dpi which does not contain enough data for the program to read.
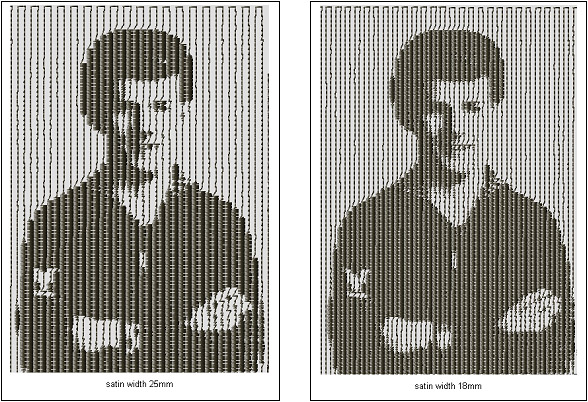
Above examples show sewing the same design with the Satin Width changed. Experiment with changing the parameters until the desired results are achieved.
To load base software 1.0.0.1 with AutoPunch 1.0.0.1 with Hyperfont 1.0.0.2 or Photo Stitch 1.0.0.2
1. Load Base software (have the machine set-up for embroidery with USB connected to both machine and computer – machine turned OFF)
2. Turn on SINGER® Futura™machine and double left click on Futura icon to open program
3. Close program and then turn off the machine
4. Install the AutoPunch program and leave the CD in the tray
5. Turn on SINGER® Futura™ machine and double left click on Futura icon to open program
6. Type in the Access code from AutoPunch jewel case and then left click on the check mark to open program*
7. Close program and then turn off the machine
8. Download appropriate update for Windows version from the Futura-Support.com updates and save to desktop
9. Double left click on the desktop icon to install update
10. Turn on SINGER® Futura™ machine and double left click on Futura icon to open program
11. Close program and then turn off the machine
12. Install HyperFont program – leave CD in tray
13. Turn on SINGER® Futura™ machine and double left click to open program
14. Type in Access Code from HyperFont jewel case and then left click on check mark to open program*
15. Close program and then turn off the machine
16. Install PhotoStitch program – leave CD in tray
17. Turn on SINGER® Futura™ machine and double left click to open program
18. Type in Access Code from PhotoStitch jewel case and then left click on check mark to open program*
* Must open the program after installing each Option with CD in tray and type in Access Code before installing next Option.
To load base software 1.0.0.2 and adding all Options - Hyperfont 1.0.0.2, PhotoStitch 1.0.0.2, AutoPunch 1.0.0.2 and Cross Stitch 1.0.0.1
1. Install Base software (have machine set-up for embroidery with USB connected to both the machine and computer- machine turned OFF)
2. Turn on SINGER® Futura™ machine and double left click on Futura icon to open program
3. Close program and then turn off machine
4. Install AutoPunch program and leave the CD in the tray
5. Turn on SINGER® Futura™machine and double left click on Futura icon to open program
6. Type in Access Code from AutoPunch jewel case and then left click on check mark*
7. Close program and turn off machine
8. Install Hyperfont program and leave the CD in the tray
9. Turn on SINGER® Futura™ machine and double left click on Futura icon to open program
10. Type in Access Code from HyperFont jewel case and then click on check mark*
11. Close Program and turn off machine
12. Install Photo Stitch program and leave the CD in the tray
13. Turn on SINGER® Futura™machine and double left click on Futura icon to open program
14. Type in Access Code from PhotoStitch jewel case and then left click on check mark*
15. Close program and turn off machine.
16. Install Auto Cross Stitch program and leave CD in tray
17. Download appropriate update for Windows version from the Futura-Support.com updates and save to desktop
18. Double left click on the desktop download icon to install
19. Turn on SINGER® Futura™ machine and double left click on Futura icon to open program
20. Type in Access Code from Auto Cross Stitch jewel case and then left click on check mark*
* Must open the program after installing each Option with CD in tray and type in Access Code before installing next Option.
Software Use-Editing
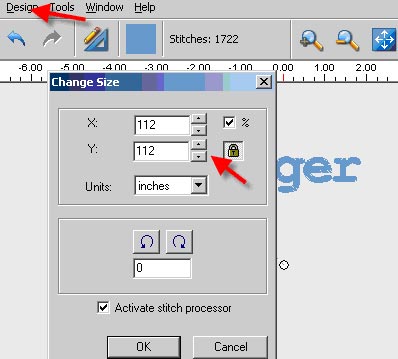
1. Open the design. Then on the top tool bar choose Design ->Change Size.
2. Left click on CHANGE SIZE (see picture below)
In this box you can either size up in inches/metric or by percentage: (see picture below)
3. Typing in a new number in the X box will change the Y number proportionally. Leave the Stitch Processor enabled to add or reduce the stitch count for the pattern.
You can size up by percentages too. Just click on the % box and then size up. Do not size a pattern more than 49% or the stitch processor will not be activated. So the largest you can make a pattern is 149% of the current size. The smallest is 51% of the current size.
You can also rotate the pattern in this dialog box by selecting a direction and then typing in an amount.
You can ‘Select Design’ and drag it larger, but be aware that it will not activate the stitch processor when you are sizing an imported design file. You will have a resized pattern with the original number of stitches in the pattern.
It’s only when sizing in the Design->Change Size dialog box that you will regenerate the stitches.
1. Close program and then turn off machine.
2. Place Advanced Editing CD in tray and follow installation instructions.
3. Turn on the SINGER FUTURA machine and double left click on FUTURA icon to open program.
4. The Advanced Editing will become part of the FUTURA program and will appear as an icon on the tool bar when you open the program.
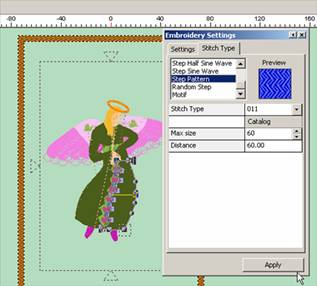
1. When working with an imported file type you will need to Convert Stitches to Block in order to change the Embroidery Settings.
2. Left click on the Edit Outline tool on the top tool bar and select the desired block. Now right click to bring up the Pop-Up menu. In the Pop-Up menu select Embroidery Settings. You can now change the Settings – density, stitch direction, underlay etc. Or select the Stitch Type tab and change the fill pattern. Remember to use the scroll button to see all the choices of pattern. If you select the Pattern Step –click on the Catalog button to see these fancy fills. After each change has been selected it will be necessary to click on the Apply button before moving on to select another change.
3. In the Settings Tab you can use Manual Setting and change the density, stitch angle, apply underlay, add outlines and change the color of the outline of the block to be different from the highlighted block. Remember to left click on Apply after each modification or the change will not be applied. Or you can choose to use PreSet and choose the fabric type you are going to sew out the design on and the software will select the proper parameters for you.
Thread Break
If you need to back up within a design, simply touch the backstitch icon on the front of your machine.
All of the Error Messages signify that the upper tension path is not threaded correctly. Check that the transparent thread path located at the top of the machine is threaded correctly.
Hold thread in both hands and slip under transparent thread guide. While holding the thread securely, pull the thread towards you and then slip it back and forth like you were flossing. You should hear or feel two clicks as the thread slips past the thread guides.
 See the diagram below: